Archive for the ‘Product Reviews’ Category.

How to Make Bread

Ok, forget what you know about making bread. Just forget it. Now read and do.

Reading this will take longer than it actually takes to make bread.

You’ll probably want to start with a single batch… just cut the recipe below in half to make 2 loaves… or quarter it for one loaf. The more bread you make in a sitting, the less cleanup there is. And refrigerated dough is easier to work with and tastes better because it ferments. But hey.

My four loaf recipe:

  • 12 cups flour
  • 6 cups water
  • 4 tsp salt
  • 4 tsp yeast

The types of flour, salt and yeast matter very little, young Skywalker. Really. Yes, really. Different ingredients make subtle differences but you’ll be so happy with how fricking easy it was to make this loaf, you can worry about that later. Try starting with All Purpose flour, Mortons salt and Instant Dry Yeast in a 1 lb bag.

Directions:

  1. Put it all in a big bowl and mix together with your hand for 60 seconds
  2. Let it rise for 45 minutes
  3. Make into loaves
  4. Bake
  5. Eat!

Really. Just mix together until it’s all wet. I use 1 hand in a big bowl because dough is terribly sticky. If you use a utensil, it’ll get stuck and gooped up (and you’ll have to wash it). If you use 2 hands, then both your hands will be covered with sticky goo!

Don’t knead it or roll it or anything. I’ve tried a couple ways of mixing the ingredients so they mix evenly. I mixed the water in with the yeast. Or poured the salt into the measuring cup or… or… forget all that! Here it is with a bit more detail, what I do and it comes out fantastic every time:

  1. Measure flour and pour into a big bowl (precision is not needed… I’ll scoop 1 1/2 cups one time and then 2 1/2 cups the next… it all pretty much averages out when you’re putting 12 cups into a bowl)
  2. Measure salt and toss onto the pile of flour
  3. Measure yeast and toss onto the pile of flour
  4. Measure water and pour onto the pile of flour. I usually reserve a little water just in case things are getting too wet… and then I almost always end up throwing it in after a few seconds of mixing.
  5. With one hand, stir and grab at the mix until it is an even, sticky gooey mess. Yes, the dough is probably much wetter and stickier than you were envisioning. Don’t remove it from the bowl, it’s too sticky!
  6. Cover it and let it rise for 45 minutes. If it grows to 1.5 it’s original size, you’re good to go.

You now have 4 loaves worth of bread dough. Put some portion (3/4?) of the mix into a plastic container and throw in the fridge for bread later in the week.

With the rest, make bread!
I put flour on my hands and the baking sheet to keep the dough from sticking.

  1. Grab a big hunk of dough and cloak it in your hands (see below) until it looks pretty.
  2. As the last cloaking move, make sure the bottom of the dough has flour on it so it doesn’t stick
  3. Set it on the cookie sheet and let it sit for 5-60 minutes.
  4. Put it in the cold oven
  5. Turn the oven to 425 and set the timer for 50 minutes
  6. When the timer beeps, remove from the oven, let cool and eat!

Here’s what I did this morning with the dough I had put in the fridge… Total work involved: 5 minutes. Total time from fridge to bread: 105 minutes

  1. Set out a cookie sheet
  2. Take the previously mixed dough out of the fridge
  3. Sprinkle the cookie sheet, the dough and my hands with flour (like 1/4 cup of flour)
  4. Grab 1/2 of the dough, pick it up quickly and set it down in the dough gently (if you toss it too roughly, the flour flies everywhere)
  5. Roll the dough in the flour until it isn’t all sticky, maybe 3 rotations.
  6. Cloak the dough, rolling in the dough in flour a couple times when it gets too sticky to handle (cloak: kneeding very briefly by holding the ball in both hands, pushing the middle up with fingers and the sides down with palms, rolling the lumpy bits to the bottom and putting a  “cloak” of smooth pretty dough on the top of the loaf)
  7. Stretch the dough to the desired shapes… I made 1 long loaf and 1 round loaf this morning
  8. Put the cookie sheet and dough in the oven
  9. Let it sit just like that on the cookie sheet for 60 minutes so the dough rises (else the loaf will be pretty dense… maybe you want that though!)
  10. Turn the oven to 425 degrees and set the timer to 50 minutes.
  11. When the timer beeps, take your amazing fresh bread out of the oven and enjoy!

Cleanup for the first batch can take a few minutes. Sticky dough is a mess to clean up. The dough from the second batch, from the fridge is easier to handle. Cold dough isn’t nearly as blob-like.

I’ve been developing a feel for this for a while but I have to thank Charlotte’s gift to me of Artisan Bread in Five Minutes a Day: The Discovery That Revolutionizes Home Baking. It validates what I’ve been doing and gave me some excellent tips.

Sometimes I play with the temperature. I think it makes the crust thicker and heartier. But I could be wrong. Instead of 425 for 50 minutes from a cold oven, I do this:

  1. Put dough in oven and let sit for a while.
  2. Set timer for 18 minutes and oven to 550. (my oven gets to 550 in about 16 minutes).
  3. When the timer beeps, set the oven to 400 degrees and the timer to 22 minutes.

I’ve tried using steam and boiling water and spray bottles to get a better crust and I can’t tell the difference between a steamed loaf and a not-steamed loaf. So I don’t do it any more.

How much yeast to use: I have a recipe book that says stuff like “add 2 1/8 teaspoons yeast unless it’s Blahblah brand and then add 1 7/8 teaspoon”. Forget that. Yeast is flexible. It grows. It’s a bug that grows in your food and it farts a lot. The longer it’s in your dough, the more farting it’ll do, making your bread nice and fluffy. I haven’t ever gone wrong with 2 teaspoons or so of yeast for a batch. When I let it set for a while, I can use less yeast (hence, I use 3 tsp and not 4 in the recipe above) because it’s busy growing in my fridge. I should experiment more with varying yeast levels. Suffice to say that I can’t recall ever having too little yeast, though once when I added too much, the bread tasted a little funny.

Which bread flour to use: It doesn’t much matter. Really. Most recently I’ve been using Giusto’s Artisian Bread Flour in a 50 pound bag because… well, Restaurant Depot sells a 50 lb bag of the stuff for $18. I figured something that sounds like “Artisian Bread Flour” might be better than “All Purpose” for bread but… I haven’t noticed much differences between different flours. Recently I made some nice loaves out of whole grain and white spelt, they came out great. I’ve used mixes of cake flour and all purpose flour, they came out great. I’ve used mixes of whole wheat flour and all purpose flour, they came out great. I noticed that partial-whole-wheat bread has less crust and tastes different. I sometimes add wheat gluten but unless I add a lot, like 3 heaping tablespoons per cut, it doesn’t do anything. When I use that much, the finished bread is stiffer but I’ve gotten little tummy aches from such high concentrations.
Where to Buy DIY Solar

Last year I tried selling residential photovoltaic solar systems. It didn’t go well. One thing that convinced me not to pursue it further was that a prospect of mine priced out a Do It Yourself system and ended up paying a lot less than what I would have charged him. I spoke to him recently and he’s very happy with the system.

He installed the system with the help of a contractor and it’s been running for a few months now just fine. He bought the hardware through Mr Solar.com  (phone 888-680-2427)  and had it installed by  Thomas Houghton, owner of  Sun Energy Engineering  (phone 925-217-1629) in Pleasant Hill, CA.

He said he has had no problems with the equipment and that the manufacturer’s warrantees are all very good. And the contractor was excellent though he had to call and pester him a little to get him on the job. You can’t really fault the contractor too sharply on that because, well, that’s how it always ends up going.

M. K. said that Sun Energy Engineering was able to get about a 20% discount off the prices published on the MrSolar.com website.

I was able to sell a 5 kilowatt system at about $8/kilowatt. That’s $40,000 complete. I estimate that M. K. got his system for maybe $24k + $3k installation = $27,000. That’s $13,000…. 1/3 off! Of course, he had to manage the process himself and figure out all the paperwork. The paperwork can be a bother but it’s certainly not $13,000 of pain!

The prices I’m mentioning don’t include city, state and federal rebate programs which often end up reducing the price of a system by half.

Goodbye Samsung SGH D807

I can highly recommend my Samsung SGH D807 cell phone. It “just works”. I use the voice recorder and camera on it all the time. I had compared the sound quality with it and several different phones and this phone (and the Cingular service) were the best for my location. It’s small and the slide mechanism is sexy.

I got an iPhone 3G for Xmas so I’m letting my trusty old Samsung phone go :-(

Lee Recommends Computer Programs

I’ve written about this before. Here is the latest installment…

Astra32 –  comprehensive information about the configuration of your system…. to help you get rid of driver problems for Windows

Open PLS in WMP: This lets you listen to streaming audio like SomaFM in Windows Media Player

Combined Community Codec Pack: This lets Windows Media Player play pretty much any video format including DVDs. You install it and it JUST WORKS :-)

HOW TO – Put DVDs on the iPhone – the super simple way. Use Handbrake

How to archive your DVD collection. Use DVD Decrypter v 3.5.4.0 by Lightning UK! (find it at your favorite warez site) The author’s original site doesn’t work anymore.


Sysinternals File and Disk Utilities:  These tools are great! I’ve only listed the first couple categories of tools here. There are more, check it out.

When you are logged onto a computer via VNC, it can be hard to tell if the hard drive is busy since you can’t hear it remotely. Run DiskMon and you can see it!

Here’s the full list of disk tools:

AccessChk: This tool shows you the accesses the user or group you specify has to files, Registry keys or Windows services. Continue reading ‘Lee Recommends Computer Programs’ »

Always-on Camera

I want my always-on camera, my black box flight recorder.

The technology is available to inexpensively produce a small device that records audio and video all day on it’s own battery power. This would be a boon to holding people accountable for what they say and do.

The device would have just 1 button on it. The user would push this button and speak to make a voice-note of a notable event that just happened. Once a day, the user plugs it in to charge and upload the last 24 hours of audio & video recording.

Imagine having this device the next time…

  • you are in a car accident
  • someone gives you directions to an address
  • you are assaulted
  • you are in a he-said/she-said discussion

It’s really a very simple device. Now if someone would just manufacture it. And that someone could be you!

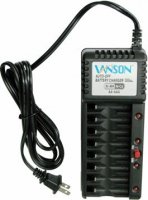
Vanson 8 AA NiCad NiMH Battery Charger

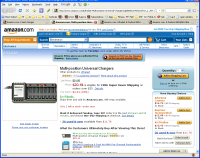
vanson-charger-v-868bI paid $3 apiece for two Vanson NiCad NiMH battery chargers at BatteriesandButter.com. I’m astounded that this same charger and many like it are for sale on Amazon for $20+.

ultralast-charger

I also got 28 GP Brand 1700MaH AA batteries for $1 each.

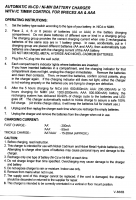
We’ll see how it works out. In the mean time, here are the instructions for the charger. The most useful details are this:

For AA batteries

  • When set to “Nicad” it delivers 200mAh for 5 hours
  • When set to “NiMH” it delivers 200mAh for 10 hours

For AAA batteries

  • When set to “Nicad” it delivers 100mAh for 5 hours
  • When set to “NiMH” it delivers 100mAh for 10 hours

After it’s finished, it delivers 10 mAh until unplugged.

I verified with a multimeter that it delivers the same amount of power to each cell regardless of how many batteries are plugged in. That’s good.

It looks like I got a super-duper deal. Check back on this page in a few months and if you don’t see me swearing, then they’re probably peachy keen.

(The instructions OCR-ed with no proofreading)

vanson-charger-instructions

AUTOMATIC Ni-CD / Ni-MH BATTERY CHARGER WITH IC TIMER CONTROL FOR 8PIECES AA & AAA

OPERATIN6 INSTRUTIONS:

1 .         Set the battery type switch according to the type of your battery. ie. NiCd or NiMH.
2.         Place 2, 4, 6 or 8 pieces of batteries (AA or AAA) in the battery charging compartment. Do not place batteries of different size or kind in a charging group. The charging group provides the correct charging current when only 2 rechargeable batteries of the same size are in 1 battery group. In case, accidentally, put in 1 charging group are placed different batteries (AA and AAA), then automatically both batteries are charged with the charging current of the AAA battery. DO NOT MIX NICKEL-METAL HYDRIDE AND NICKEL-CADMIUM BATTERIES.
3.         Plug the AC plug into the wall outlet.
4.         Each compartment’s indicator lights where batteries are inserted.       ^
If you have inserted batteries in a compartment, and the charging indicator for that
compartment does not light, unplug the charger immediately. Remove the batteries
and clean their contacts. Then, re-insert the batteries, confirm correct polarity, plug
in the charger again. If the charging indicator still does not light, either the charger
is not working properly or the batteries you are trying to Charge are defective.
5.         After the 5 hours charging for NiCd (AA: 600-800mAh; AAA: 200-300mAh) or 10 hours charging for NiMH (AA: 1300-2000mAh; AAA: 500-800mAh) battery, the recharging System has delivered 80-90% of Charge cycle to the batteries and LED goes off. The charger automatically switch to trickle Charge to assure a safe 100% füll Charge. (At trickle Charge Status, it will keep the batteries füll for instant use.)
6.         Unplug and then replug the charger each time when you recharge the empty batteries.
7.         Unplug the charger and remove the batteries from the charger when not in use. CHARGING CURRENT:

FAST CHARGE:-

‘AA       -200mA
‘AAA’       -80mA

TRICKLE CHARGE:-

‘AA/AAA       – 15-20mA(APPROX.)

CAUTION:
1 . Before charging, read instruction.
2. This charger is intended for use with Nickel Cadmium and Nickel Metal Hydride batteries only. Attempting to Charge other types of batteries may cause personal injury and damage to the charger.
3. Recharge only one type of battery (Ni-Cd or Ni-MH) at each time.
4. Do not Charge longer than time specified. Overcharging may cause damage to the charger and battery.
5. Do not expose charger to rain or moisture. Indoor use only.
6. Remove from mains when not in use.
7. The supply cord of this charger cannot be replaced; if the cord is damaged, the charger should be discarded or retumed to the supplier for repair.
8. This charger is intended to be correctly orientated in a vertical or floor mount position.

V-868B

Valentina Ristorante

Last night Charlotte and I went to Valentina Ristorante in Bernal Heights. It was just terrific.

Where to buy prescripton eyeglasses…. online!

I haven’t made the plunge yet but I’ll be taking this person’s suggestions and buying my next pair of prescription glasses online. (Actually, I’m making this post mostly to remind myself of that blog post)

Here’s a copy of his article in case the internet eats the original

Adventures in $40 eyeglasses
Matthew Haughey | Nov 29 2007

Glasses purchased online Last year, I stumbled upon a blog post about buying prescription eyeglasses online. It sounded too good to be true: you could get any frames you wanted quickly and cheaply, and the comments were filled with optometrists freaking out. Eventually, the author launched a dedicated blog for it called Glassy Eyes. When the site was recently mentioned on MetaFilter right around the time I was getting my 2-year exam, I decided to take the plunge myself and order some glasses online.

Why Buy Online?

As a lifelong near-sighted person, prescription eyeglasses and especially prescription sunglasses have long commanded a high premium due to the seemingly precise and scarce nature of creating them. Until a few years ago, I only had two options for eyewear: my optometrist (here’s an employee admitting they pay less than ten bucks per pair) or a 1-hour place like Lenscrafters (which is part of a multinational monopoly). About ten years ago, when I was fresh out of college and scraping by month to month with my first real job, I broke my only glasses and had to pay $400 for an emergency pair (that were ugly and I hated and I wore for two more years before I paid off the old ones and could afford new ones). For far too long, glasses have been expensive.

Today things are different, with Coscto and Walmart bringing prices down to the $100-150 range for frames/lenses and they serve as a good economical option to the mainstays. With the advent of online sellers, it’s now possible to get a decent set of specs for anywhere between $20-$100. The online selection is phenomenal as well.

Get Your Measurements Right

First thing you need is an up-to-date prescription. Though people usually get one every 2+ years, most optometrists will only honor them for a up to a year afterwards. If you’re getting one soon, you’re in luck, because you can go in knowing a little more than the average patient. When you’re done with the standard exam, ask the eye doctor or an assistant if they can give you your pupil distance. It’s a simple matter of looking through a binoculars-like device that measures the distance between your pupils. It should be a number in millimeters and be sure to write it down either on the prescription or on a piece of paper (if you get two numbers, that’s right/left which you can add up to be the PD). If you forget to ask or already visited an eye doctor recently, you can measure the PD yourself, by simply printing out a ruler and looking in a mirror (or taking a photo of yourself with the ruler below your eyes).

Armed with your prescription and your PD, you’re all set for ordering any glasses you want online.

Measure What You Have, Know What You Want

Goofy PhotoBooth shot of my new glasses It helps if you have two things: a bit of fashion sense and a measuring tape. I personally loved my last pair of eyeglasses (paid $500 at a fashion eyewear store two years ago), but they were a bit too short in the lens height department which became annoying as I could often “see” below my lenses during common everyday tasks. The glasses fit well otherwise and armed with my wife’s soft sewing measuring tape, I took millimeter measurements of all aspects of my old glasses: lens height, lens width, length of bridge (distance between lenses), total width of lenses plus bridge, and the length of the side arms.

Now that I had my prescription (with PD), and my frame measurements, I copied it into a text file and kept it open as I shopped online. I knew I needed lenses around 53mm wide, about 20mm apart, and the arms needed to be at least 135mm long. My old too-short lenses were only 26mm tall, so I was looking to get something with around 30mm of lens height. Some online shops let you plug all these numbers in and specify what you want to search on as the most important (I did “lens height must be at least 28mm” search), but most all online shops will display the measurements below each frame, which should help narrow down your searches.

In terms of frame design, I knew I wanted a half-rim frame (metal/plastic top and arms, clear lens below) or a full plastic frame, and most every online shop categorizes frames for sale by their construction in this way. Knowing that you want frameless glasses or nerdy plastic retro glasses definitely helps making shopping online easier because some online shops can offer 500+ different varieties of just one style of eyewear. If you’re not quite sure what you want, you might want to browse a real eyeglasses store for a bit to narrow down your desires.

Ordering Up, Playing the Waiting Game

Once you find something you like and it’s about the right size, it’s time to order. Plug in your prescription details (if you can’t make them all out, most sites have helpful tips on deciphering a prescription) and pick out your options. The one option that will turn a $20 pair of glasses into an $80 pair is the lens choice. Be careful when picking out a lens because there are plenty of add-ons you might or might not want. Generally I pay for the highest level of non-glare coatings and I usually pick the middle of the thin-lens options (my personal prescription rules out the thinnest, lightest lenses). Most of my online glasses have run about $50 or so.

Shipment and fulfillment is generally pretty good. I ordered five pairs of glasses total, from four different retailers and started receiving pairs about a week later. The longest one was maybe three weeks, which is about normal for most optometrists, so in general ordering online was faster than higher cost traditional options.

The Verdict?

Cop glasses, with finger moustache I used to wear the same glasses for 3-4 years between changes so I’m finding it incredibly liberating to pick from five different sets of glasses each morning. I have a couple fashionable pairs for going out, a couple understated ones for working and I can even take a chance with a wacky retro frame if I’m in the mood. All told, my glasses cost me from a low of $26 to a high of $84 per pair, mostly depending on the options I picked for lenses. If I had to come up with any criticisms, the only (very) minor issue I had was one pair’s lenses (with identical prescriptions on both sides) were cut slightly different, so that when the light hits them, you can see a bit more of border on one lens over the other (like I said, it’s minor). I purchased frames from four different companies mentioned on the GlassyEyes site and every pair showed up intact and the prescriptions all seemed identical.

I’ve had such good success with it that I recently ordered some higher priced specialized sports glasses online, saving about 35% over what an optometrist office would charge. Overall, I couldn’t be happier with the process of buying glasses online. I’m happy to have several backup pairs and different styles to fit my mood. About the only drawback is that there is almost too much selection online. Picking out each frame took me about an hour, after wading through 150-200 results and checking measurements on the ones that caught my eye.

I encourage anyone looking to save some money and get a bigger selection to search online. Glasses are no longer a scarce resource costing many hundreds of dollars, they can be as simple as buying a DVD or book online, and cost about the same.

Some of the comments mention good results with


my current glasses
160 50 19
temple length 160
eye size 50
bridge size 19
Pupillary Distance 65mm (I think, measured myself)

DoublingStocks.com: scam

I clicked on a Google Ad for DoublingStocks.com. The ad and the site was very adamant about how terrific their service was. I googled around and found several sites with people that didn’t have good things to say about it. And then here was the clincher:

This Pennystocks.com page had lots of info about the company that showed them as being sketchy (like that their published phone number didn’t work and their published address isn’t a real building) and pointed me to this archive.org page about the company’s previous endeavor, pokerbobby.com.

A pretty compelling tidbit is that these grifters reused images from their previous job. Note the two pages below. :-(

pokerbobbycom

doublingstockscom

The Tightrope Walker’s Dream: Inspiration and Encouragement

Today’s inspiration and encouragement comes from my downstairs neighbor. The only thing I can add is that, in the Author’s Corner, he writes, “this book was truly delightful to make”. I can visualize him saying that and I absolutely believe him. This is worthwhile. Click below and enjoy.

The Tightrope Walker's Dream by Graham Best