Secure Your Public Wifi Usage
Q: When you are in your local coffee shop sipping on a latte, surfing the web, what prevents your neighbor three rows over from stealing the internet passwords you type in?
A: Nothing!
If you go to web sites that start out “https://”, (the “s” is the important part), you’re safe. But if you log in to non-secure sites, which happens all the time, your neighbors can “sniff” the network and see exactly what you are doing. To protect yourself, you need to use some kind of security. To get all geeky on you, I’m going to describe using a proxy through SSH tunneling, or possibly described as making a VPN to the cloud.
I took this content from Shanghai Web Hosting. He’s got some good geekery content there. Check it out. I’ve tried it myself and it took just a few minutes to get it going. If you are baffled by this but are worried, and you’re a friend of mine, then call me!
I used my web host provider, Dreamhost as the tunnel server. If you don’t have a web hosting provider (IE a company that hosts a web site like Dreamhost hosts Lee.org for me), then… umm.. that’s another issue.
In brief, here’s what happens when you use this system
- You set your web browser once to use the new secure tunnel.
- You connect to the trusted server with SSH. A secure tunnel is automatically created.
- The bad guy 3 rows over sipping a latte and sniffing the cafe’s internet connection doesn’t see your passwords.
————————————————–
As SSH is inherently tunnel-enabled for setting up socks5 proxy servers, you can instantly turn your personal computer into a socks5 proxy server by the help of PuTTY through your web hosting server, breaking through firewalls. The idea is to direct all traffic from your local computer browser through PuTTY SSH session to the web hosting server and back from it.
Here we go:
- First, make sure your web hosting provider provides SSH access to your hosting server. DreamHost (use coupon CASH60 for $60 discount) as well as a lot of other hosting companies do.
- Second, download PuTTY, run it, and set up the SSH account by entering your hosting server address in Host Name (or IP address).
- Add SSH tunnels by:
Connection -> SSH -> Tunnels -> give it a random Source port (in this example, ‘8844′), enter Desctination as ‘localhost’ and select Dynamic and Auto, and clickAdd. Now there should be an item of ‘D8844′ in the Forwarded ports list.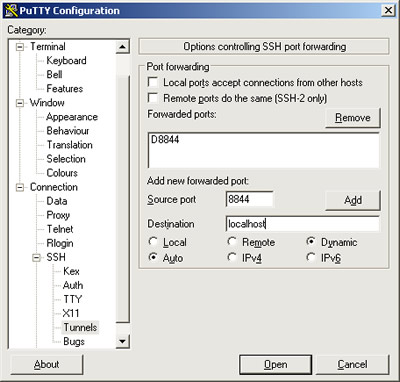
- You may want to switch back to Session to save the session for easy access so that a simple double click would trigger the connection based on all the configurations you have done so far.
- Double click the saved session and log into your SSH account. Now you are in your web hosting server.
Leave the SSH session open and your personal computer has now become a socks5 proxy server. Open your favorite browser, for example, FF3:
- Tools -> Options -> Advanced -> Network -> Settings -> Manual proxy configuration -> SOCKS Host: localhost, Port: 8844 -> OK
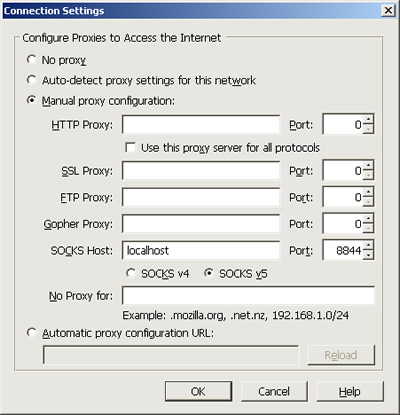
- You are now set. Fire up a tab and surf through the socks5 proxy on your local computer.
Remember though, that all traffic you use by browsing the web pages and downloading whatever stuff by the local proxy goes through your web hosting server and will be counted on the hosting bills.
Exciting! Now you’ve got your very own proxy server (socks5 server is the most versatile among all types of proxy servers including HTTP proxy and FTP proxy) that’s local, stable and in your perfect control for getting around all kinds of firewalls. Screw all those obsolete online proxy server lists with unusable proxy servers!
I haven’t used it yet but a program like FoxyProxy or Proxifier can help make it easier to enable this kind of system. Those two applications were recommended to me by security-conscious friends.
—————————————–
Once you’ve got that setup, you can put a shortcut on your desktop of wherever that lets you start it quickly. Make the Target of the shortcut look something like this and it’ll start your new Saved Session but quick.
C:\Users\Lee\Programs\putty.exe -load “enable proxy tunnel”
And if the Saved Session has a hostname that looks something like this, you won’t have to type in the username, only the password
User@lee.org
—————————————
Ok, now you’re ready to run VNC through an SSH proxy tunnel. I found instructions on DSLReportts.com that work. This worked for me in about 10 minutes :-)
Using VNC through a Putty SSH tunnel
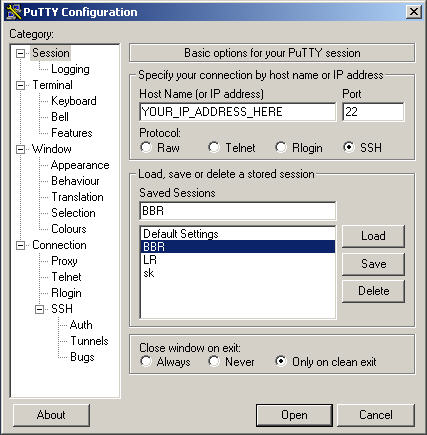
Run putty and setup an SSH connection and tunnel to the VNC server.
In this example we have setup an ssh connection to YOUR_IP_ADDRESS_HERE and given
it the session name BBR .
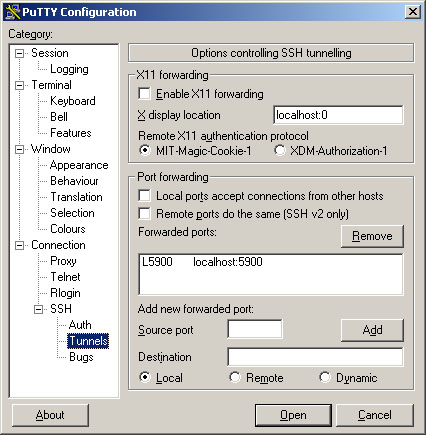
Finally set up a tunnel from port 5900 to your computer to port 5900 on
the VNC server. (as shown below)
Now you must save the session otherwise you’ll need to do it all again
next time you make a connection.
Open the session and make a connection to the SSH server.
Step 4.:
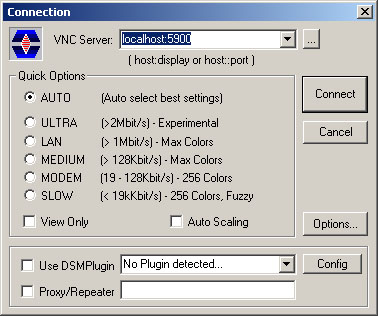
Run the Ultra VNC viewer and make a connection to localhost:5900.
You should have a login prompt from the VNC server machine now.
Brian on Noisebridge writes: Just a friendly reminder that if you use Firefox and do not use a system-wide proxy program like Proxifier, but instead manually specify a SOCKS proxy, you should change the advanced configuration setting (in about:config) network.proxy.socks_remote_dns (set it to true). Otherwise DNS will be outside of the proxy, but Internet traffic will be inside.
You can use the software from http://www.interwap.ro . They have free access at 384kbps and low prices for up to 50mbps high speeds.