 .
.
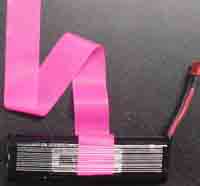
Add a strip of plastic to your batteries so they will be easier to find when
they eject from the plane on impact. My strip is only about 4" (a lot
shorter than the photo)... that's easier to tuck in for flying.
Here's several Zagi making hints I've found online. Most of them came from ClubZagi.com and YourZagi.com. The best reference is the Zagi Manual pdf from Mike's Hobby Shop. Cliff at Atlanta Hobby has been my pleasant & responsive pushe... Zagi dealer. Those sites have a lot more tips than I list here. Check 'em out. I've rewritten these hints with my own comments.
Zagi Manual (9meg zip) - good
Use Shoe Goo or other silicon based adhesive to attach the motor to the plastic pod this keeps it from coming out on hard impacts with the ground.
Use the old 3M 77 spray adhesive. It was discontinued in 2002 or so. But don't use the new stuff in the purple and black can!! They changed the formulation to be better for the environment but the new acetone formulation eats the foam. I don't know what you should use instead, sorry!
|
.
|
Add a strip of plastic to your batteries so they will be easier to find when
they eject from the plane on impact. My strip is only about 4" (a lot
shorter than the photo)... that's easier to tuck in for flying.
|
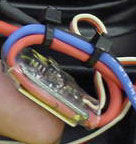
| When the speed control is put in the plane, loop the wires around itself and put a zip tie on them so that when the battery is pulled out of the plane in the event of a crash the strain is on the motor not the speed control. |
|
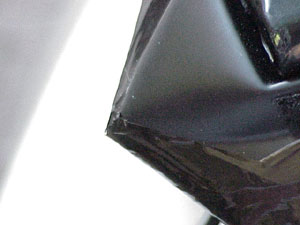
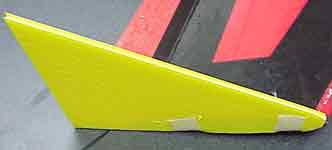
| Cut the nose back a little from the leading edge of the plane. This will let the foam absorb some of the impact not the plastic. This ultimately didn't save my tip from cracking, but what are ya gonna do? |
|
 |
Use the extra foam that is in the kit to make a landing and launching skid
on the bottom of the plane. I haven't done this yet. I used the extra foam
for other little things. Oop!
|
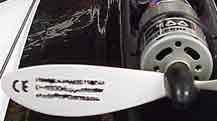
| The props have to be turned around were the lettering is toward the back of the airplane as shown in the picture. |
|
 |
We found that the lexan tips that it comes with cause the plane to wonder
find some coraplast sign material and cut your own wing tips this will help
stability in flight. Use 2 mm coroplast... most roadsigns are 4 mm.
|
|
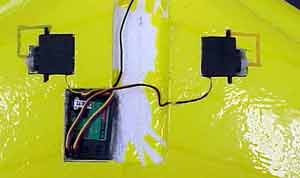
When installing the receiver in the Zagi 400 X the instruction call for it
to be placed in the nose of the airplane. Don't put it there! Mount it in
the wing on either side of the electronics pod this will protect the
receiver in a crash. Also note the servos are laying down in the wing not
standing upright.
|
|
|
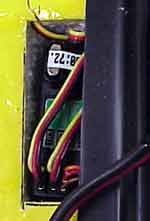
Note receiver is half way under tray with xtal on the outside for easy
changing if necessary. The receiver will be covered by the colored tape when
the tray is taped on. (Zagi 400X)
|
-------------------------------------------------------------------
 When
you examine the wing core, you might notice strands or "hairs" of glue
and hard plastic. Gently remove these with your fingertips or gently pry up the
tip of one strand with a knife to get it started. If your kit included a small
block of EPP foam, this can be used for gently rubbing off all of the excess
foam "hairs".
When
you examine the wing core, you might notice strands or "hairs" of glue
and hard plastic. Gently remove these with your fingertips or gently pry up the
tip of one strand with a knife to get it started. If your kit included a small
block of EPP foam, this can be used for gently rubbing off all of the excess
foam "hairs".
You might find some fairly thick pieces that wander across the wing. This is a
normal side effect of the hot wire used to cut your core. Gently pry them up.
The truly large ones might leave a small indentation in the foam after you
remove them. The foam will slowly expand out again over a few hours so try not
to worry about them. This is normal.
-------------------------------------------------------------------
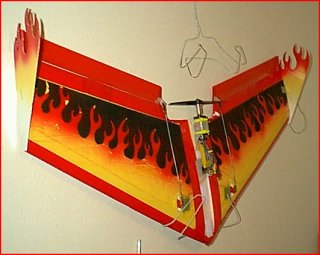
Use a coat hanger to hang it on the wall.
-------------------------------------------------------------------
put strapping tape on the inside of the battery tray, top and bottom. To keep the tray in one piece.
-------------------------------------------------------------------
When you get your first roll of Monocote, know that before you try to stick it to your plane, you should peel off the very thin, transparent protective coating. My first time, I didn't catch this important point and just cranked up the iron... it stuck, but crappily.
-------------------------------------------------------------------
If your elevon comes off during flight, exciting things are bound to happen. The Mylar hinge tape provided with the kit is fine, but there is a better solution which can be applied to all of your aircraft. Winter flying plays havoc with the stock hinge tape as too many fliers have discovered 300 feet AGL (above ground level). Strapping tape does not seem to be as susceptible to thermal weakness as the Mylar hinge tape is. If you originally used the hinge tape, check it during the winter if you fly during cold weather, and certainly before the first flight after winter. At some point, replace it with strapping tape.
Before applying your hinge tape, make sure you mask off the elevon and lightly spray some Super 77 on it. Let it dry before applying the tape. Although S77 is not required when applying strapping tape, it should be done regardless to ensure that your hinges will not come off until after the aircraft is destroyed.
The best example of this has been done by Andy Willetts and is show here.

|
If you have 3/4" or 1" width strapping tape, you
can use the over-under tape hinge method.
You will need at least two "sets" per elevon and should do three if you can afford the weight. If done correctly, it simply does not fail. (click for a slightly larger picture) |
 |
A compromise is to do 3 sets with only 2 hinges per
set. Over 100 flights have been done with these particular hinges and
they have never come loose or needed to be replaced.
(1600x1200 large picture warning) |
Some have used the over-under hinge, then extended their Ultracote or a film covering over and around the elevon for additional strength and clean looks. If you do this, make sure that you have not added a tremendous amount of resistance that your servo now has to overcome.
Buzzman has a great picture that shows an alternative method for hinges that you can view here.
------------------------------------------------------------------
http://www.yourzagi.com/covering.htm